About Me

My photo
Former preschool and kindergarten school psychologist turned stay at home mom and felt food designer. Mr. Felt Food & I are total foodies and our daughter Grace is becoming one, too!

Friday, April 15, 2011

Snacks by Letter: Snacks Starting with the Letter C


Snacks for C Day or Week
Clementines
Cereal
Cheerios
Currants
Cucumber slices w/veggie dip 
Celery sticks with veggie dip or peanut butter
Cherries
Carrot sticks with veggie dip or peanut butter
Cauliflower (raw with veggie dip)
Chips (baked tortilla) with salsa
Colby cheese
Chocolate pudding
Caramel dip with apple slices
Caesar salad wrap (wrap in whole grain tortilla)
Canape with fresh fruit
Cheese and crackers (whole grain)
Cheddar cheese
Cherry tomatoes
Chewy granola bar
Cinnamon sprinkled on natural, unsweetened applesauce
Citrus fruit
Coconut
Cottage cheese (could be with fruit also)
Confetti Salsa with baked tortilla chips (corn, black beans & salsa)
Crackers (whole grain)
Circus animal crackers
Craisins
Cream cheese on a bagel
Coffee Cake
Crepe filled with fresh fruit
Chex mix (Chex cereals, pretzels, cheerios, nuts, dried fruits, etc.)
Cantaloupe


Thursday, April 14, 2011

A Productive Week


I don't stress eat any more since I opened this etsy shop.  I stress sew & create.  Mr. Felt Food Kids' job may be moving us soon and we'll find out in the next few weeks to month.  Nothing I can do about it & we believe that God will put us where He wants us and yet I still wake at 2 a.m.  Unable to sleep, I've been getting up and getting to work.  Mr. FFK needs his sleep after all and that's hard to get with me tossing and turning.  Plus, it's calming to me to sew, sew, sew and sew I do!

Stack of bacon waiting for fat strips sewn on.

An army of bacon waiting for final seams and a final inspection.

Storing the eggs and bacon.  Just looking at this pic
makes me hungry!

There are plenty of times I'll work for a bit when Grace is awake.  What's my secret?  It's truly a secret ingredient that encourages  imaginative play and allows her to "work" right beside me.

RICE!

Toss rice in a 9 x 13 container and let the kids go to work.
She started playing with just a spoon.

After awhile, she ran & got more utensils from the kitchen.

Then her little people came to play.  Soon there were about a dozen
warming their toes in the warm "sand" beach she created.

If you have carpeted floors, be sure to put down a vinyl tablecloth or
sheet to contain the mess a bit.  Be prepared to vacuum, too though.
While she worked, I got some packaging labels made.
I'm loving the rainbow of colors!

Wednesday, April 13, 2011

Peek Inside My Studio Part 2

Here's a look at the rest of my studio.  Someday I will move to a new, bigger place with custom storage and....ah....a girl can dream!

The dresser actually holds Grace's clothes but on top are all the important
"stay out of this Grace" items like spools of ribbon.  Those bins stacked on the
right are full of felt.  The bottom bin is the darkest colors, next bin is the lighter colors,
fabrics are stacked that don't fit in bins & the top bin holds larger sized scraps.

Another look at the bed/storage space for current projects.


By the doorway?  Boxes of projects I should finish someday .
The paper bag holds small felt scraps.
I don't want to waste any!


I am so grateful the closet has doors to hide the mess!
That pullout shoe organizer from Target really holds embroidery
floss, ziplock bags, modge podge, sewing baskets, etc.

Above the small stash of Grace's hanging clothes:  more boxes and bins!
This is long term storage for Christmas gifts I'm sewing as well
as craft supplies like cross stitching fabric, etc.

On the right side of the closet, drawers full of bias tape, seam binding,
ribbon, thread, everything I need to sew, sew, sew!

Stacked on them are folded stacks of fleece & clothes to upcycle.
The denim jackets are for an upcycle project & there are large lengths
of fleece on hangers to keep them out of the way.

Above that?  More storage with bins of more long term crafting
supplies, organized by type.

Finally, this small nightstand from my childhood is my
mailing station.  I keep my receipts for taxes in the shoebox and large
envelopes & boxes are to the right.


Thanks for looking through my mess that I call organized.  We may be moving soon & if so a large studio is at the top of our wish list.  I'll buy better storage when that happens but for now, I use boxes and dream!

Sunday, April 10, 2011

Potato Toy Parts Storage Bag Tutorial with Free Pattern!


When I saw Skip to My Lou was doing a teacher appreciation theme this week I was inspired. Teacher appreciation week is May 2-6, with May 3rd as the actual official day.  Grace is only two so she doesn't have a teacher yet but as a child with a language disorder, she does have a speech therapist/speech teacher.

Sarah, our SLP, comes to the apartment once a week with a giant bag of toys. We have tons of toys here of course but there's something magical about toys coming from Sarah's bag. Even Mr. Potato Head, Grace's favorite, is more fun if it's from Sarah's bag.

I always smile when Sarah brings out the toys, too. She keeps each one in a gallon zip lock baggie. A beat up, barely holding the pieces baggie. It's time for an upgrade, particularly for Mr. Potato Head. He's Grace's favorite and as such, he needs a home of his own. I think Sarah will appreciate this gift, too. It's something she can use every day, it's machine washable, and it's a heck of a lot cuter than those raggedy plastic baggies. Plus, she'll be able to find it in her bag faster--that bright green with white polkadot fabric really stands out!

Creating storage bags for toys is nothing new but I thought I'd share this idea for the teachers/therapists in your life who might need a bit of an upgrade & my take on the Mr. Potato Head storage bag.

Love the bag but hate to sew?  Contact me to custom order at http://www.facebook.com/FeltFoodKids

Materials
cute fabric for bag (mine is 11 inches x 28 inches)--bigger if you want to hold more than one
scrap of brown material for body
scraps for the other parts
wonder under (used in applique process)
ribbon or cording for the drawstring bag
pattern (see below)

Instructions
1. Wash & dry all fabric you're going to use. You don't want it to shrink after you've worked so hard on the project!
Tip: I always wash & dry all my fabric when I come home from the store, then put it away. That way it's ready to use whenever inspiration strikes.

2. Cut out pattern pieces. Trace onto the smooth side of wonder under. I use pen but I've used pencil before, too. Just don't write on the bumpy side and don't cut the shapes out yet. Cut around the shapes, leaving a nice margin.


3. Following manufacturer instructions, iron wonder under to your fabrics. You know, brown for the body, white and black for the eyes, etc. I find it's best to then peel back a little of the paper backing off right away just to get it started, then I cut the shape out before pulling the paper backing off all the way.


Peeling backing off a little before I cut out the shape
so it's easier to peel off later.
4. Fold your bag fabric in half to help figure out where you're going to put your applique. We'll sew the applique on first then make the bag. My measurements are for a bag that will hold one potato head & pieces. If you need to hold more, just change the measurements to suit you. I actually put a potato head on the fabric to help size the bag. I centered mine toward the bottom of the bag because we'll need a little extra room at the top when making the bag.

At the top you can see I selected cording as the drawstring for this bag.
I got mine in the ribbon by the yard section of JoAnn's this week for less than $2.
5. Iron on the body first (iron the fabric for the bag first if yours looked as wrinkled as mine!). Make sure you have put the side with the wonder under down on your fabric & not facing up. The last thing you want is your fabric "glued" to your iron!

6. Stitch around the potato head. You can use a tight zigzag or applique stitch around the edge or straight stitch like I've done. The fabric will fray over time up to the stitching line but I think that it looks cute when that happens.

7.  Repeat the process.  I started with the nose, then eyes, etc.  I used a permanent black marker to draw the pupils since they are so small.


I've heard wonder under can hold without the stitching but I didn't want to risk it with as much use as this bag will get!

Instructions to Make the Bag:
1.  Fold fabric in half, right sides together.  Sew a seam down each side.  I used the edge of my foot as a guide.


2.  Make the casing for the drawstring/cord/ribbon.  There are several techniques to do this but I use the fold over 1/4 inch, then fold over again so the casing is plenty big for the cording and stitch a seam.  Be sure to leave an opening for the drawstring to go in!

Folding over about a quarter of an inch.

Folding over a second time to make casing big enough for my cording.

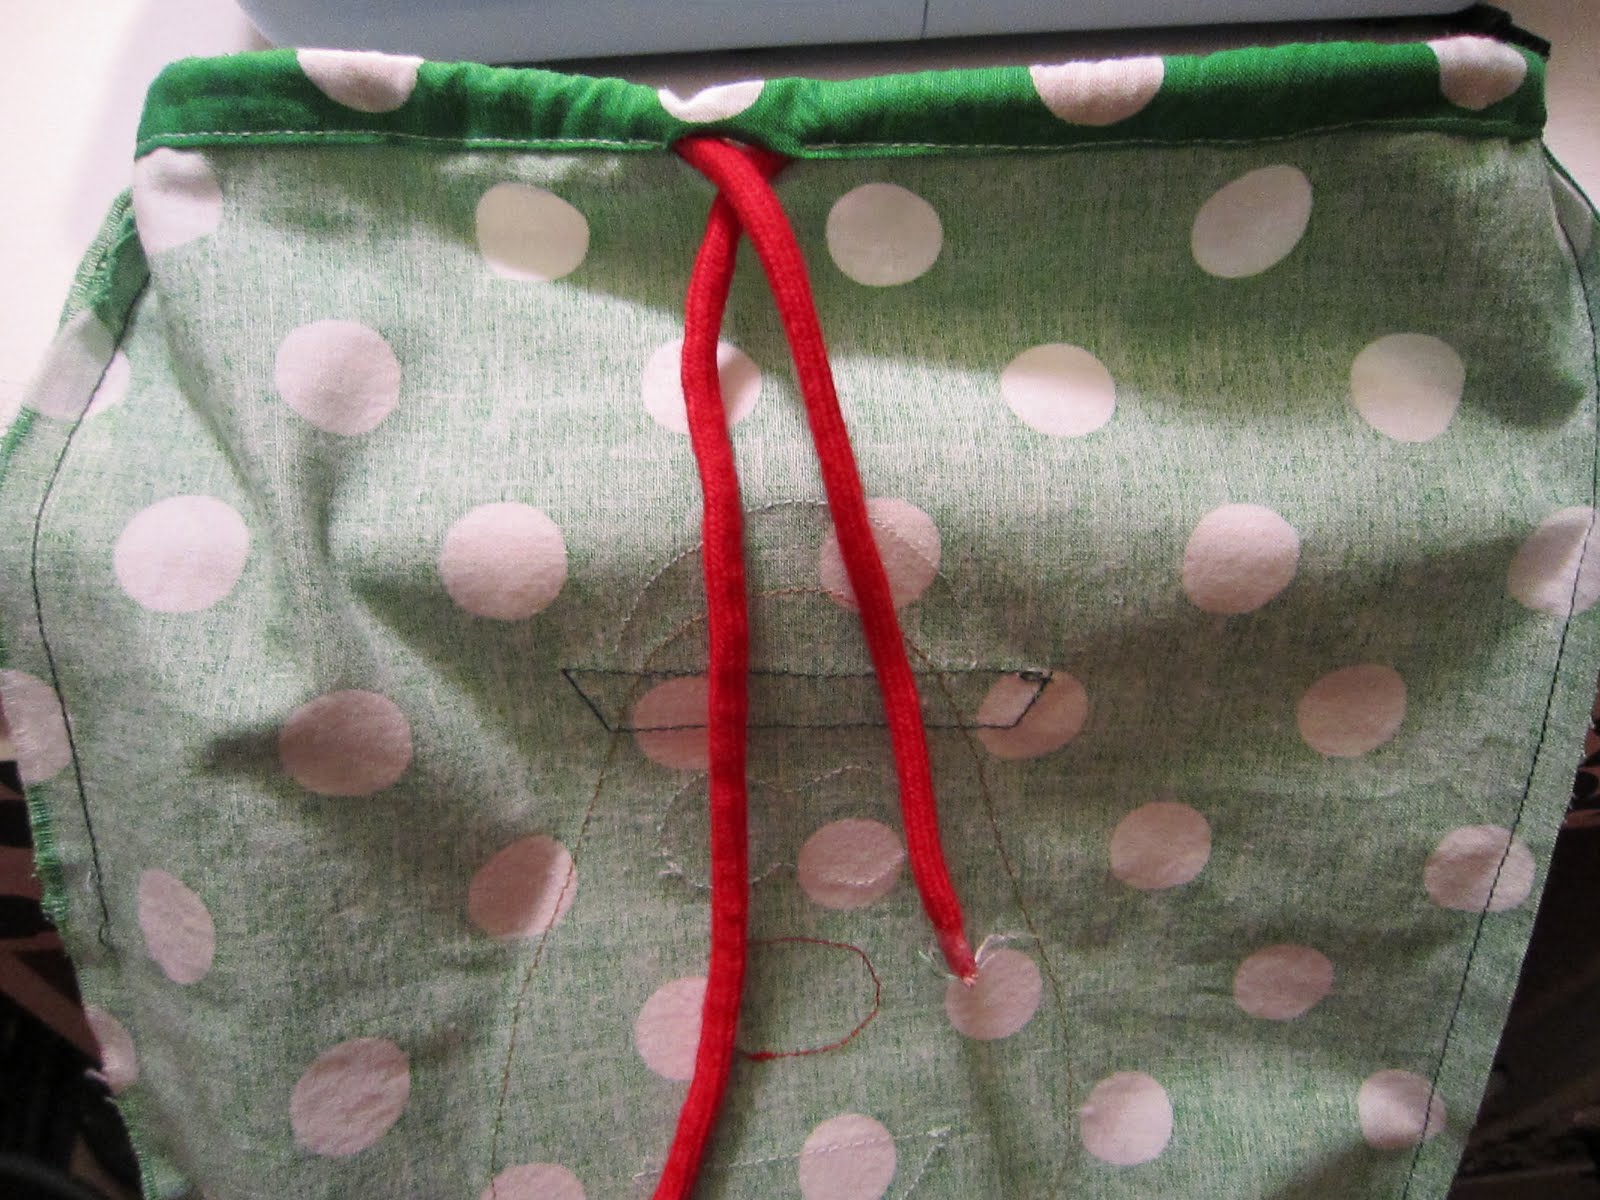
Leave an opening to push the drawstring through!  I left mine in the front center of the bag.
3.  Push the cord/ribbon you are using as a drawstring through the hole & around the bag.  This takes time & patience.  I always hate this part of bag making!  If you get the cord stuck in the seams on the side, sometimes it helps to just pull the cord back out and work it through in the other direction.


4.  Great job!  I chose to have the cord strings on the inside of the bag so they didn't get stuck on all the other items in the SLP's bag.  Feel free to do it the opposite way if you prefer.  I tied a knot in the ends of the cord so they couldn't slip back through.  Just turn the bag right side out & you are finished!

Ta da!
Ready for the pattern?  This is my first time attaching a pattern to a blog post & I did it in picture format.  You should be able to click on it & print.  Hopefully it works!  I included my pattern for ears.  I realized at the last minute that I didn't have a good "ear" color so skipped it for this bag.

Enjoy!


Friday, April 8, 2011

Snacks by Letter: Snacks Starting with the Letter B

Our Healthy Alphabet Snacks series continues with....


Snacks Starting with the Letter B
blueberries
broccoli (raw with dip)
bananas
berries
blueberry muffins/bagels
blackberries
boysenberries
butterfly shaped crackers (Pepperidge Farm)
bagel (with fruit spread, cream cheese or made into pizzas)
bell pepper slices with veggie dip
bing cherries
black bean salsa with baked tortilla chips
black raspberries
bread (whole grain with peanut butter)
buckwheat pancakes
blackberry/boysenberry/berry flavored yogurt
boiled egg
bran muffins


Next Friday I'll be back with.................you guessed it!  The Letter C Snacks!

Wednesday, April 6, 2011

Making the Bacon


Did you know there are only 262 days until Christmas?  Jenny (of http://www.etsy.com/shop/kidzcraftz) is always reminding me that the entire year is always about prepping for the Christmas rush.  When I opened my shop this past December, I found out for myself what most felt food makers already know:  don't sell what you don't have.  I was selling bacon and eggs faster than I could make it!  It was a little extra stress to an already busy holiday season.

Now that the slow season is here, it's time to get ready for Christmas.  I spent a whole weekend doing research. My geeky psychologist side came out and now I have spreadsheets full of data that will make things easier for me.

I've also started a photographer search, looking for an awesome photographer to take pics of my felt food in exchange for getting to keep it all.


Most importantly though, I need to start stocking.  I've done a little of that but now my research has helped me figure out how many slices of bacon I'll need until January.  That's right, January 2012.  As a stay at home mom, it's Mr. Felt Food Kids who really brings home the bacon. Of course, if you need to make bacon, then I'm your girl!  I find it's best to make it in large batches and only a few times a year (it's more work to make than you think).

Before I could get started, this had to happen. Grace down for a nap.
My goal:  Cut 90 sets of bacon before she woke up.

If you make felt food or work with a lot of felt/fleece, a scissor sharpener is essential.

She woke up before I was done but then we both did our work together.
She takes her work so seriously!  She used red crayon--maybe she was drawing my bacon?  lol
As you can see from the previous pic, I work hard to keep the work area clean.
With a trash can beside me, I sweep scraps in immediately.
Then Grace comes along.....and dumps them all.
She had so much fun though!
185 slices of bacon (cut a few extra) are cut for a total of 92.5 sets.
Whew!


Monday, April 4, 2011

Peek Inside My Studio

Ok.  I can't believe I am sharing this already.  No really--some things aren't meant for others to see and that includes my sewing/crafting addiction!

Background:  Mr. Felt Food Kids has moved me quite a few times in the past few years.  Our last move was to this small apartment in Milwaukee while we wait for our home to sell.  We moved at the end of October........and it looks like we'll be moving out of state for his job again in about two months, much longer if we're lucky.

Why organize?  Why not just keep it all in boxes?

My two etsy shops (http://www.etsy.com/shop/FeltFoodKids and http://www.etsy.com/shop/AmazingGraceCreate) are starting to take off and I need to find things quickly!  Those of us with sewing/crafting addictions realize that these hobbies can take up a large part of your time.  The last thing you need is to search through piles and boxes for 30 minutes every day.

So this week I organized and fully unpacked my sewing studio.  Oh my!  I worried Mr. Felt Food Kids would get a little frustrated when he saw how many boxes of things I have accumulated.  I am grateful for 2 things in life:  1) professional movers packed us so they were the only ones who knew the truth as they pulled boxes from storage and packed more and 2) Mr. Felt Food Kids' mother was an avid sewer so he grew up with this kind of collection.

Overview:  My Sewing Studio, just organized!
I'll share the first half of photos this today and the other half next Monday.  Please do not call the show Hoarders and report me!  You're looking at my sewing studio.  This is what you do if you need a guest room, will be moving in a few months (no sense in buying storage shelves until I have a more permanent space) but need to organize.


I use the guest bed for current projects.  That's a stack of men's dress shirts being transformed on the edge of the bed, a pair of jeans I need to mend for Mr. Felt Food Kids beside it (why do those projects always get put off?), onesies getting ready for applique up near the pillows, and an adorable red fleece coat I'm sewing for Grace this spring.  Ready for a closer look?


I'm not proud of the Tower of Terror on the left.  I'm trying to decide on a storage solution--I'm sure there will be many blog updates as I finally organize my things.  This is my first time finally having a space of my own so bear with me!

Diaper box #1 is cotton scraps, #2 is flannel scraps and #3 is baby clothes waiting to be made into a quilt for Grace.  That's right I make lots of baby clothes quilts for everyone else but my own daughter's is barely started!  I'm waiting as I collect more outfits, right?  lol  The big blue bin, nicknamed BIG BLUE, holds burp cloths, shoes, and onesies listed at AGC.  The dresses are in another closet.  The bin under that is finished baby gifts for my brother and sister.  Neither family is expecting but someday.... :)

The stack of see through bins with white lids are full of patterns and more long term projects that I have yet to finish.  I'm hoping keeping them in sight will help inspire me to finish them!


This bookcase was recently reclaimed from Grace's play room.  The bottom shelf holds a felt in each color (don't worry, I have bins more of felt--this is my starter collection used to start projects, lol).  On the top shelf, there are 2 rows of Christmas fabrics.  I'm making Christmas quilts as gifts this year.  On the right is a few more flannels and vintage bed linens stacked on top of those.

The wooden basket on top holds baby shoes in baggies, ready to be finished.  It's honestly quite a good system.  The black milk crates on the right?  Those are FULL of felt food.  So full I need more storage & am working hard to try and figure out what that will look like.  As we've all seen now, my studio is very full.


Here is where the magic happens, lol.  The kenmore sewing machine is a $90 model I got for $10 on craigslist and Old Bessy is a work horse.  I have no idea how she has survived this long (2 years) and would like to get a better model and give Old Bessy a bit of a break but that will have to wait, especially since Old Bessy is hanging in there.  Poor thing works every day and I'm not always nice to her, making her sew several layers of denim not to mention the felt and fleece fluff that often crams her crevices.

The desk I got for free at the side of the road.  A coat of paint, scrapbook paper & decoupage and she was looking pretty good.  Then Grace decided to rip paper off.  *sigh*  Of course the desktop is never empty.  Those are 2 baby bibs waiting for velcro (now done).

The pile on the floor to the right of the desk is supplies I'm going to sell soon.  Promise.

This is getting embarrassing! 
Now it's really not pretty!  The bookshelf on the left is FULL of fabrics.  On top are grocery sacks.  I cut the tops off to make storage bags and use them to store shoes I have cut but have not started sewing (about 25 pairs in each bag, individually bagged).  I've written the size on the outside of the bag.  After the stacks of fabrics, I have a shelf for cricut and those supplies & the bottom is books full of patterns (I use plastic sleeves in 3 ring binders to store my felt food patterns), other sewing books, etc.  Funny, I see all that fabric and yet there are times I try to sew & think I have nothing that will work!  It's similar to the "I have nothing to wear" while staring at a full closet of clothes phenomenon I think.

You'll see inside the cabinet in a minute but on top are my photo taking supplies.  The furniture on the right is a dresser from Ikea that actually does store Grace's clothes.  On top, I have a basket full of symphony broadcloth scraps in a million colors so I always have the right color on hand, a handy ribbon organizer full or ribbon and another basket full of misc.  There are 2 jelly rolls, various ribbon scraps and some clothing tags for my AGC shop in there right now.

This, my friends is why the doors are always shut.

I got the storage cabinet at a garage sale for $5 and am thankful to have something with doors!
Top shelf:  craft glue, diapers for burp cloths washed & ready to go, zip lock bags
Second Shelf:  organizers full of thread, projects completed but waiting for other pieces (ie:  burp cloths waiting for me to finish the matching diaper bag), and I also store inspirational pieces here--a vintage doll quilt I want to replicate, etc.
Third Shelf:  Containers with velcro, ribbon, & other scraps, a small stack of designer fat quarters, a baby quilt that is started
Bottom Shelf:  A box of vintage patterns next to a pile of vintage fabrics

This is as far as I'm going today.  It's half of my studio.  I'll share the other half next Monday.  For now, I need to hide in shame at all my supplies, etc.  Oddly enough Mr. Felt Food isn't bothered by it at all but he does agree that whenever/where ever we move, I will always need a dedicated work space.  I also feel the need to add that my mother is worse!  :)  She once told Mr. Felt Food: "she who dies with the most fabric wins" and he seems to have believed it for now.

Later this week I have a review of a local restaurant that needs to be featured on Diners, Drive ins and Dives, a post on cooking with kids (or at least cooking with Grace), and join me again on Friday for more Healthy Snacks.  This week it's the Letter B!